


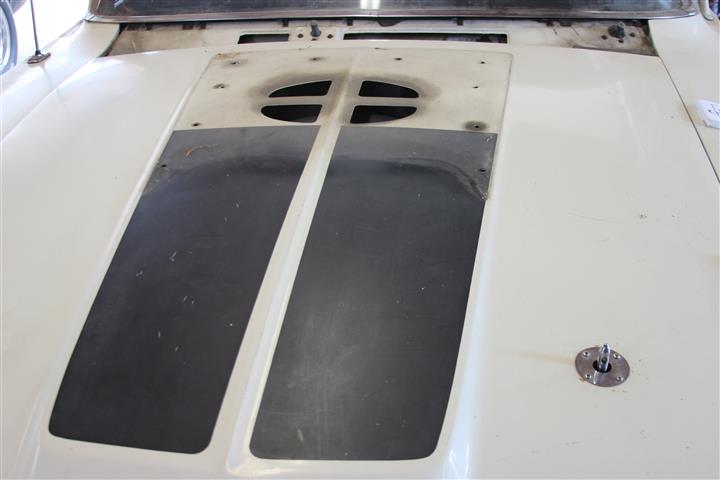
One of our Team Members, Brian Abshier, is restoring a Cale Yarborough Spoiler and purchased one of our reproduction wings for his car. Unfortunately, the restoration shop also “lost” his original hood and he had no idea where the hood scoop should go. To save on shipping and to look at how a scoop is mounted he decided to pay us a visit recently. That made me think that there may be more than one of you out there that wants to install a hood scoop but you’re not sure where the factory installed it. Since we have both a restored and an original Spoiler in our garage I decided to run some measurements and see how well they compare and they were square on with each other. I have included photos of both cars since there was one big difference.

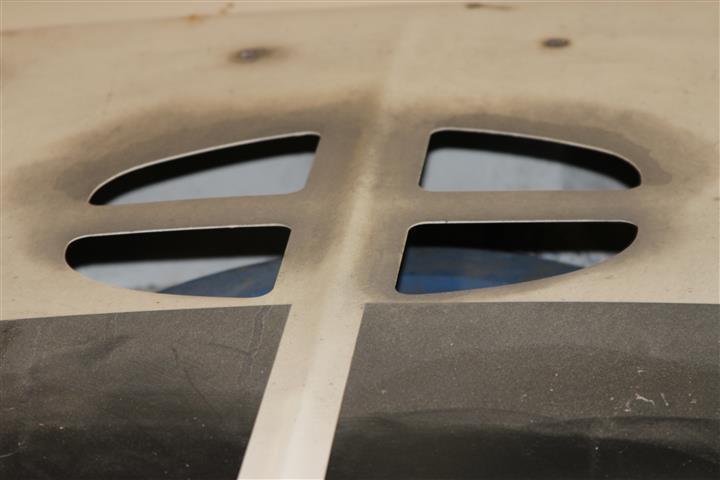
Both cars have Ram Air but the hole in the hood is not the same. The original car has four holes with a cross in the middle. The restored car has had the cross removed. I am not absolutely sure which way is correct from the factory. I have seem many cars with the center cut out but have also seen plenty with the cross still in place. If I had to make a guess I would say the cross is factory and those that are cut out were gearheads looking for less air restriction into the carb. In addition, where the cross is removed on the restored car the cuts are very rough like they were made with a hack saw. Does anyone know for sure which way is correct?


The first step was to measure how the scoop fit onto the hood. Both cars had the same dimension from the rear of the scoop to the back edge of the hood.

There are 10 studs that screw into the hood scoop, the holes in the hood are 5/16″ in diameter. These studs and nuts are available from different sources and are well worth the reasonable price to do it right.

The most tedious step was getting the measurements for the location of each hole. You will note that our measurements are not always symmetrical to the center line of the hood. This caused me some real concern but then I measured the total distance between the holes on the scoop and they matched the total dimensions on the hood. The warning or the lesson here is to use these dimensions BUT ONLY AFTER YOU HAVE CONFIRMED THEM TO MATCH YOU SCOOP!


Here is a picture of the hood with each hole numbered and then below I have given you the dimensions for each hole from the back edge of the hood and from the center line of the hood.

ALL DIMENSIONS ARE IN INCHES
Hole Number From Back of Hood From Center of Hood
1 5 3/4″ 10″
2 5 5/8″ 3 5/16″
3 5 11/16″ 3 5/16″
4 5 3/4″ 10 1/8″
5 11 1/2″ 9 1/2″
6 11 1/2″ 9 5/8″
7 18 13/16″ 9 9/16″
8 18 13/16″ 9 5/8″
9 25 3/16″ 10″
10 25 3/16 10″
The following identification numbers were found on the underside of the scoop:
Ford Assembly
40-2444 C9GB-16C664-C
Ford Panel
C9GB-16056-C
40-2445


Richard,
It has been my experience with R code Mercury’s & Fords that the entire section is cut out. I have found the pie cut {cross} on non R code cars. Every original R code car that I have owned or looked at {includind 1969 Cougar} has had the entire section removed. Yes they are very rough cuts. This make sense as it will make the sealing process easier. If you had a piecut there would be more turbulance especially for the primary side of the carb.
as the air is restricted by the smaller cut out
I do not have any specific documentation for this, but have looked at & owned many R code cars and draw my conclusion from these findings
After our visit with you I believe everything you say.If you say the sun shines at midnight I’m wearing sunglasses. LOL Hope you’re
well, buddy.
Yikes,we are all in trouble now!
Thanks Tom, but as I said I am going off what I have found. We are learning so much about these cars since Richard has started this website. We have a wealth of information that we have never had before. Thanks to people like Rick Ochs,and everyone who participates with documents. Learning about our special cars is half the fun! The other half is meeting great people with the same passions! Thanks to Richard who helped by putting this website together.
Marty, I just read my comment to Tom and thought it might be misunderstood. It was not intended to be disrespectful of your comments. I have the upmost respect for your opinions. It was directed at Tom’s “sun glasses” comment and my thought, no fear, of him building airplane parts at “midnight with his sun glasses on”! I had visions of a dimly lit machine shop with the floor covered in aluminum scrap and B52 airplane parts, a highly detailed airplane inner structure on the work bench and Tom as a crotchety old engineer with sun glasses, a jug of moonshine and fabricating a new all-aluminum body for a Spoiler II. LOL
Richard
No problem I took your comment just like you meant it. I thought it was funny.
It is all good!
Thanks!
Marty
I have two hoods with the cutouts and one with the pie cuts. They are original paint and look stamped out not cut.
Alan,
No one is questioning that the pie cuts are factory. The question is did R codes get them. I have not seen any original car that was a R code that had a pie cut. They were all an opened hole. I have looked at Torino’s Cyclone’s & Cougars {since they share the same scoop as Cyclones} I have not come across a single R code with a pie cut. I have had Q codes & S code cars & they all had pie cuts {no open hole among them}. I have seen over the past a couple of pie cut hoods on R codes but these hoods were changed & not the ones the car was born with.
Hope this helps!
The hood with the pie cuts is off Project Rustout. It is a R code Cyclone. It is white with black stripes just like the photo above.
This question I find most interesting !.. 1st. I have never owned a Cyclone or Spoiler II so I am using documentation to see what I can find out. I have got into this as to the cut out’s on the Torino hood on one of the proto type Talladega’s this was a R code car .
As a Torino I looked it up in the Ford Master text, the picture shows in this book a hood with the pie cuts and not a flat hood but we know not all Torino / Fairlanes received a hood scoop…Than using a 1969 Ford parts book we found the same picture, pie cuts , no flat hood ?
Thing is the Ford part number for a non cut out hood is same as a cut out hood. Now I have a pie cut hood (used) and a few flat hoods (no cut outs) hoods in the shop. the hood scoop is part number C9ZZ-16C630C right for the Torino/Fairlanes.
Now looking up the Cyclone hood we find a picture of a flat hood, No cut outs (used a Ford Motor Company Autolite body and collision
parts catalog again one part number for hood panel. Now the Hood scoop part number is C9GY16C630B Different than a Torino. now a Cougar for 1969 Hood Scoop is Part number C9WY16C630B again a different number than the Torino/Fairlane .
So if it was 1972 and I had a 69 Torino or Cyclone in my shop for front end damage and needed to replace the hood with a scoop how do I know I am gets one with the cut outs ? Well using a Crash Book looking up a 1969 Torino hood I see the hood is part number C8OZ-16612-B and when I get the hood from Ford it states in the Crash Book I will receive Hood Scoop Installation Instructions as to install and cut outs…..so that tells me the panels for scoop and non scoop hoods were the same and were cut out at factory and not stamped ….now using other crash books I found a time add factor for hood scoop add on this stated “with exposed safety catch add .4 ” this would be pins…. than it stated ” with non-functional air scoop add.3″ with functional scoop add 1.0 for 6 hole cuts or Ram Air add .8 for box cut ” Now looking at the cut outs (pie) I have on hood in shop (Torino) as they do look stamped there is a bit of off sizing in the cuts where I feel if they were stamped they would be same size….for what it is worth.